
Your refrigerator has been running constantly, your energy bill keeps creeping up, and you have no idea why – chances are, the condenser coils haven’t been cleaned in years. This guide walks you through exactly how to clean refrigerator coils, why it matters more than most people realize, and how to tell when the job is overdue. [IMAGE PLACEHOLDER FOR IMAGE1]
Most homeowners in Abbotsford never think about their fridge’s condenser coils until something goes wrong. And by then, the compressor has been working overtime for months, sometimes years, running up electricity costs and quietly shortening the appliance’s lifespan. At Abbotsford Appliance Repair Pros, we see this regularly – a fridge that “stopped working” turns out to have coils so packed with dust and pet hair that the compressor finally gave out. It’s one of the most preventable appliance failures there is.
The Fraser Valley climate doesn’t help things. Homes here tend to run their heating systems hard through the cooler months, which stirs up a lot of dust. Add a dog or cat to the mix, and those coils can go from clean to clogged faster than you’d expect. Whether you’re in an older rancher or a newer townhouse, this is one maintenance task that pays for itself.
Key takeaways
- Dirty condenser coils can reduce your refrigerator’s energy efficiency by up to 30 percent, meaning your fridge burns significantly more electricity just to stay cold.
- For most households, cleaning the coils every six months is a reasonable schedule – homes with pets or high dust levels should lean toward the shorter end of that range.
- The whole job takes 15 to 30 minutes and requires only a vacuum with a brush attachment and an inexpensive coil brush, available at most hardware stores for under ten dollars.
- Always unplug the refrigerator before you start. This is not optional.
- Coil location varies by model – bottom front, back panel, or top – so check your owner’s manual before you start pulling things apart.
- Some refrigerator models manufactured after 2001 have sealed condenser systems that don’t require cleaning, so confirm your model before you spend time on a job that isn’t needed.

What condenser coils actually do
Condenser coils are the part of your refrigerator’s cooling system that releases heat to the outside air. Think of them like a radiator. The refrigerant inside absorbs heat from the food compartment, carries it to the coils, and the coils release that heat into the room. A small fan assists with airflow to keep the process moving.
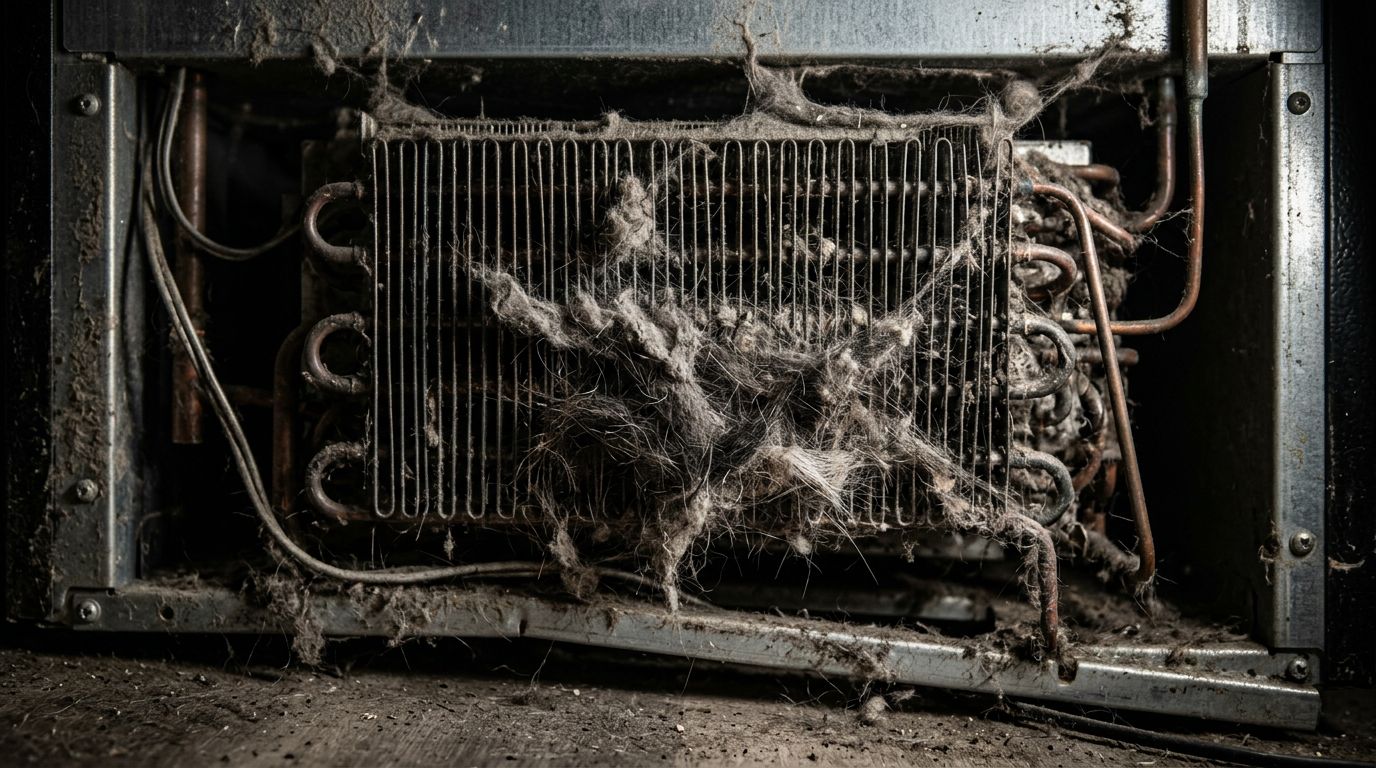
When dust, lint, and pet hair accumulate on the coils, they act like insulation – trapping the heat instead of letting it escape. The refrigerator’s compressor then has to cycle on more frequently and run longer to compensate. That extra workload adds up on your energy bill, and over time it wears the compressor down prematurely. Compressor failure is usually the point where a repair bill becomes “just buy a new fridge” territory.
In our experience, this is one of those problems that sneaks up on people. The fridge seems fine right up until it doesn’t. There’s rarely a dramatic warning – just a slightly higher electricity bill, food that doesn’t seem quite as cold as it used to be, and a compressor running more than it should.
How to find your refrigerator’s condenser coils
Before you grab any tools, you need to know where your coils are. This varies more than most people expect, and getting it wrong means pulling apart the wrong panel for no reason.
On most modern refrigerators, the condenser coils sit at the bottom front of the unit, behind a removable kickplate or base grille. You pop it off – usually it snaps free by opening the doors, placing your hands at the ends of the grille, and pushing in on the top while pulling up on the bottom. On older models, especially fridges from the 1990s or early 2000s, the coils are often mounted on the back of the unit. Those are easier to spot but harder to reach because you have to pull the fridge away from the wall. A small number of models have the coils at the top, behind an upper panel.
If you’re not sure, the owner’s manual will tell you exactly where to look. Most manufacturers also have this information on their support websites. Whirlpool’s product help documentation, for example, walks through coil location for each model line and includes notes on which models have sealed condensers that don’t require cleaning. GE Appliances has a similar resource. Worth a five-minute check before you start.
One practical note: many fridges with front-bottom coils have wheel stops – essentially brakes – that keep the unit from rolling. If you need to pull the fridge out, look for these behind the kickplate and release them first. A surprising number of people wrestle with a fridge that won’t budge without realizing the wheels are locked.
Step-by-step: how to clean refrigerator coils
[IMAGE PLACEHOLDER FOR IMAGE2]
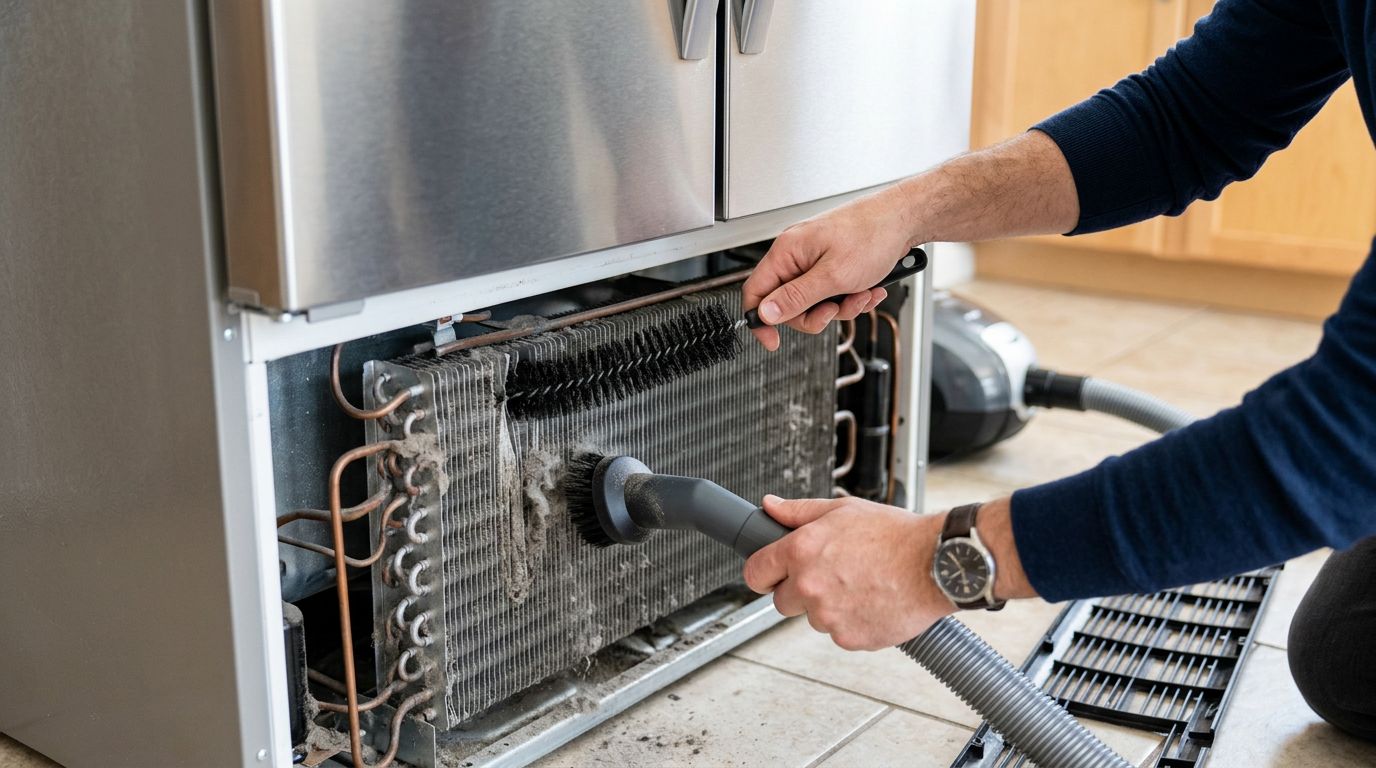
Alright, let’s get into it. This job looks more intimidating than it is. First things first – unplug the refrigerator from the wall outlet, or shut off the circuit breaker if the outlet is hard to reach. No exceptions here. You’re working near electrical components and the compressor, and you want zero current running through the appliance while you do it.
Once the power is off, remove the kickplate or access panel. For bottom-front coils, snap the grille free as described above. For back-panel coils, you’ll need to pull the fridge straight out from the wall. Do this carefully and in a straight line to avoid running over any water lines or power cords. For top-access models, the front grille panel lifts up to reveal the machine compartment – wear gloves here, because the condenser fins have sharp edges.
Now, the actual cleaning. Start with a vacuum fitted with a brush attachment. Work gently along the grain of the coils – moving with the direction of the fins rather than across them. The goal is to lift the dust away without bending the fins or tubing. For compacted buildup that won’t vacuum off, a refrigerator coil brush is what you need. These are long, flexible brushes designed specifically for this job. GE Appliances lists part number PM14X51, which is 27.5 inches long with 12 inches of bristles – useful if you’re working with back-mounted coils that are hard to reach. Whirlpool recommends their Maintenance Brush, part number 4210463RW, for similar work. Either way, any hardware store coil brush in the under-ten-dollar range will do the job for most residential fridges.
Work the brush through the coils to loosen packed-in debris, then vacuum up what falls loose. Things will get dusty fast, so keep the vacuum close. While the panel is off, clean the panel itself – a quick rinse in the sink with soap and water works fine. Let it dry completely before reattaching it.
Once everything is cleaned and the panel is back in place, plug the fridge back in. That’s it. Fifteen to thirty minutes, start to finish.
If you have pets
[IMAGE PLACEHOLDER FOR IMAGE3]
Pet hair deserves its own mention because it behaves differently than regular household dust. It mats together and compresses into the coils rather than just sitting loosely on them. This creates a denser buildup that restricts airflow more severely, and it accumulates faster. If you have dogs or cats that shed, inspect the coils every three months rather than every six. You may be surprised how quickly they load up again.

The vacuum-and-brush combination is still the right approach, but you may need to spend more time with the coil brush working through matted hair before the vacuum can pull it all free. Some people in this situation use a stiff-bristle brush first, then vacuum, then brush again. A dust mask is worth wearing if the buildup is heavy.
Signs your coils may already be affecting performance
Sometimes the fridge gives you signals before anything fails outright. The compressor running almost constantly is a common one – you get used to the occasional hum of the fridge cycling on, but if it seems like it never really shuts off, that’s worth investigating. The coils are a logical first place to look.
Food spoiling slightly faster than expected, or the interior temperature feeling warmer than it should, can also point to coil buildup. Same with the outside of the fridge feeling warm to the touch near the bottom or back – that’s the heat that isn’t dissipating properly. None of these symptoms automatically mean the coils are the problem, but they’re a good reason to pull the kickplate and take a look before calling for service.
We get calls from Clearbrook and Auguston about this kind of issue fairly often, particularly in spring when people are doing a more thorough clean of the house and finally get around to pulling the fridge out. The coils they find have sometimes been untouched for three or four years. The fridge is usually still running, but it’s struggling. A good cleaning and it often comes back to normal performance without any parts or repairs needed.
When cleaning isn’t enough
Cleaning the coils fixes the efficiency problem in the large majority of cases. But sometimes the coils are clean and the fridge is still running constantly or not cooling correctly. At that point, you’re likely looking at a different issue – a failing compressor, a refrigerant leak, a faulty thermostat, or a broken evaporator fan. These aren’t DIY fixes for most people.
There’s also the question of models where the coils aren’t accessible to the homeowner at all. Most refrigerators manufactured after 2001 with sealed or “NeverClean” condenser systems fall into this category. The coils are in a location that either doesn’t accumulate debris or can only be serviced by a technician. Check your manual before assuming cleaning is needed.
If you’ve cleaned the coils and the fridge is still running hard, or if you open that kickplate and see something that looks more like a serious mechanical issue than just dust, that’s the point to call someone. Continuing to run a fridge with a failing compressor accelerates the damage and can leave you with a much larger repair bill – or a failed unit entirely – down the road. The ENERGY STAR program run by the U.S. Department of Energy has useful guidance on refrigerator efficiency and when an aging unit may cost more to run than to replace, which is worth a look if your fridge is getting up there in age.
In Abbotsford, older homes in areas like Matsqui Prairie sometimes have fridges that have been in service for 15 or more years. At that age, even clean coils may not be enough to offset a worn compressor. That’s a conversation worth having with a technician before investing in repairs.
Frequently asked questions
These are the questions that come up most often when homeowners start looking into refrigerator coil maintenance. Some of the answers are simpler than people expect.
How often should I clean my refrigerator coils?
Every six months is the standard recommendation for most households. If you have pets that shed, or if your home is dustier than average – near a construction site, for example, or in a home with older ventilation – every three months is more appropriate. The honest answer is that the right interval depends on how fast the coils accumulate debris, which varies a lot from house to house.
The easiest way to calibrate this is to check the coils after your first cleaning, then again three months later. If there’s significant buildup already, shorten the interval. If they’re still fairly clean, six months is probably fine for your situation.
Can dirty coils permanently damage my refrigerator?
Yes, they can. The compressor bears the brunt of the extra workload caused by dirty coils, and compressors aren’t cheap to replace. In many cases, a compressor failure makes the repair cost close to or exceeding the value of the fridge. The good news is that regular coil cleaning is an easy way to avoid putting that kind of stress on the system in the first place.
There have been cases where a fridge stopped cooling entirely because the coils were so clogged the compressor simply overheated and shut down. A good cleaning sometimes gets the unit running again. But if the compressor itself has been damaged from prolonged overheating, cleaning the coils won’t undo that.
Do I need any special tools?
Not really. A vacuum cleaner with a brush attachment handles most of the work. A dedicated coil brush – the long, flexible kind sold at hardware stores – is helpful for dislodging compacted buildup, but it’s not strictly required if the dust is loose. A flathead screwdriver may be needed to remove certain panel types. That’s genuinely it for most fridges. The Consumer Reports appliance maintenance section is a good reference if you want to cross-check tool recommendations for your specific fridge brand or model.
My fridge is against the wall with very little space – do I have to move it?
Only if the coils are on the back. For fridges with front-bottom coils behind a kickplate, you don’t need to move the unit at all. That’s actually one of the advantages of most modern fridge designs. If your coils are on the back, you’ll need to pull it out – but most fridges are on wheels, and once you release the wheel stops, they roll out fairly easily. Just go slowly and watch for the power cord and any water lines if you have an ice maker or water dispenser.
What if I clean the coils and the fridge is still running constantly?
Clean coils rule out the most common cause, but there are others. A worn door gasket that lets warm air in, a faulty thermostat, a malfunctioning evaporator fan, or a refrigerant issue can all cause the same symptom. If the coils are clean and the problem persists, it’s time to have a technician take a look. Continuing to run a fridge with an underlying mechanical issue rarely ends well.
Wrapping up
Cleaning your refrigerator coils is one of those maintenance tasks that takes less than half an hour, costs almost nothing, and can meaningfully extend your appliance’s life while keeping your energy bill in check. The basic approach is consistent regardless of fridge brand: unplug the unit, locate the coils, use a brush and vacuum to clear the debris, reassemble, and plug back in. Do it every six months, or every three if you have pets. Most people who’ve never done it are genuinely surprised at what they find the first time. If you’ve cleaned the coils and things still aren’t right, or if you’re looking at a fridge that needs more than a dust clearing, that’s where professional service makes sense. At Abbotsford Appliance Repair Pros, we handle fridge repair across Abbotsford and the surrounding area – including situations where the coils are the least of the problem. Give us a call and we’ll figure out what’s actually going on.