Microwave not heating food — what to check and when to repair

Your microwave is spinning, the light is on, the fan is humming but the food comes out stone cold. Here’s what’s actually going on inside that box, what you can safely check yourself, and when it’s time to call in a pro. Frustrated person with cold food from microwave There’s something uniquely frustrating about a microwave that runs perfectly fine but refuses to heat anything. You stand there, waiting, and pull out a bowl of soup that’s exactly as cold as when you put it in. At Abbotsford Appliance Repair Pros, we hear this complaint regularly and the good news is that a surprising number of these calls turn out to have simple explanations that take five minutes to sort out. Abbotsford homes tend to run their appliances hard, especially through the cooler months when everyone’s relying on quick weeknight meals. When a microwave goes down, it throws off the whole kitchen routine. So before you start pricing out replacements, let’s work through this properly.

Key takeaways

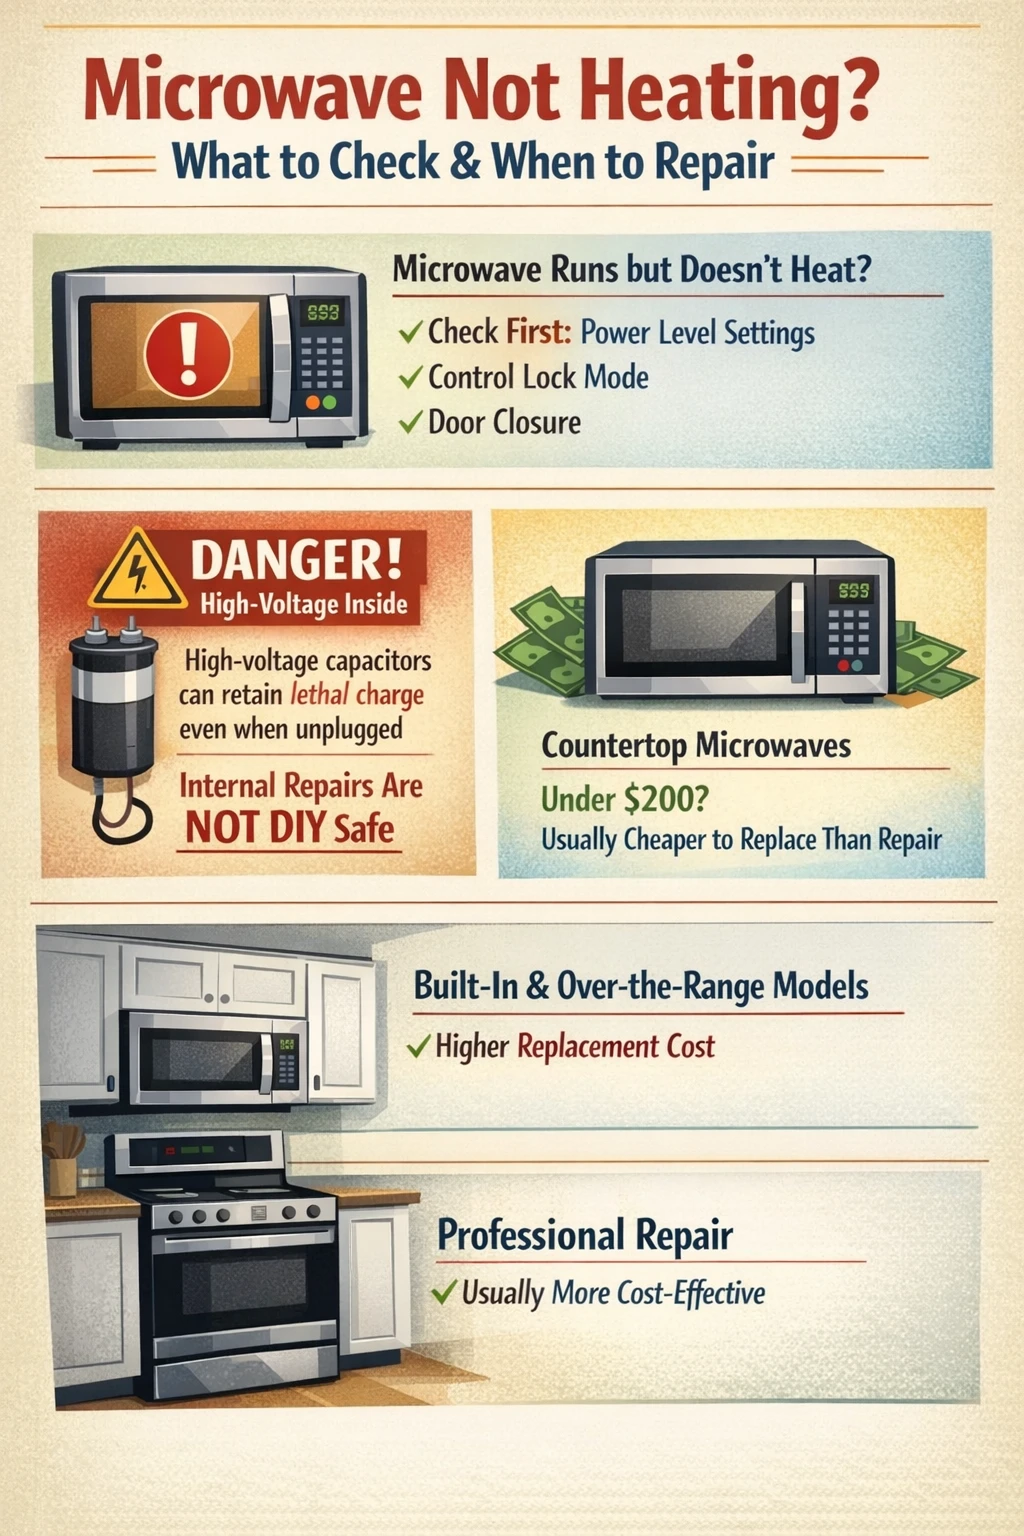
  • A microwave that runs but doesn’t heat is almost always caused by one of six things: a power issue, a locked control setting, a low power level, a faulty door switch, a blown thermal fuse, or a failed internal component like the magnetron or high-voltage diode.
  • Always check the simple stuff first power level, control lock mode, and door closure before assuming something is broken inside the unit.
  • Microwaves contain high-voltage capacitors that can hold a lethal charge even after the unit is unplugged, which is why internal repairs beyond the door switches are best left to a qualified technician.
  • A countertop microwave that costs under $200 is often cheaper to replace than to repair once you factor in a service call, parts, and labour.
  • Built-in and over-the-range models are a different story their higher replacement cost, plus the expense of a trim kit or installation, often makes repair the smarter financial call.
  • Unplugging a microwave and leaving it off for 10 minutes can clear minor software glitches and is always worth trying before anything else.

Microwave not heating troubleshooting infographic

Why your microwave isn’t heating

When a microwave runs but doesn’t heat, the magnetron isn’t firing. The magnetron is the component that actually generates the microwave energy responsible for cooking food. Everything else the turntable, the light, the fan, the display can work perfectly even when the magnetron is completely offline. So a running microwave that won’t heat isn’t really ‘working.’ It’s just going through the motions. The causes range from embarrassingly simple (the power level got bumped to 10%) to genuinely complex (a failed high-voltage diode or blown thermal fuse). We always tell people to start at the simple end of that list. You’d be surprised how often the fix is free. One thing worth knowing upfront: microwaves are not like toasters or dishwashers when it comes to DIY repair. The internal components operate at voltages that can seriously injure or kill, and those capacitors hold that charge even after you unplug the unit. There’s a real line between what’s safe for a homeowner to investigate and what needs a trained technician.

Start here: the checks that cost nothing

First things first before you do anything else, unplug the microwave and plug it back in. Leave it off for at least 10 minutes. This resets the internal computer, and in some cases a corrupted power level setting or a stuck mode will clear itself. It sounds too simple to be real, but we’ve seen it work more times than we can count. Once you’ve done that, check the power level setting. Most microwaves have between five and ten power levels, and it’s easier than you’d think to accidentally knock it down to level 1 or 2, especially on touchpad models. A microwave running at 10% power will heat your food so slowly it might as well not be heating at all. Check that the power is set to 100% (or whatever level is appropriate for what you’re cooking) before assuming anything is broken.

Control lock and demo mode

Two settings that trip people up constantly are Control Lock Mode and Demo Mode. Control Lock is designed to prevent accidental operation while you’re cleaning the panel you hold down a button for a few seconds and the controls freeze. Many microwaves show a small ‘L’ or ‘LOC’ on the display when this is active. If your controls seem unresponsive, this is the first thing to check. Your owner’s manual (or a quick search of your model number online) will show you exactly how to disable it. Demo Mode is sneakier. Retailers use it on display floor models to show the appliance running without actually heating anything. In Demo Mode, the turntable spins, the fan runs, the light comes on but the magnetron never activates. If your microwave ended up in Demo Mode somehow (a common result of a power surge or someone pressing the wrong sequence of buttons), it will perform a perfect imitation of a working microwave while cooking absolutely nothing. Check your manual and disable it if it’s engaged.

The door and the door switches

Microwaves have a safety interlock system built around the door. The unit will not heat unless the door is confirmed fully closed by a set of internal switches. These aren’t just one switch most models have two or three, acting as redundant safety checks. If a door switch fails, the microwave may appear to operate normally. The turntable spins. The fan runs. The light may or may not behave oddly. But the magnetron won’t activate because the safety system never got the ‘door is closed’ signal it was waiting for. Before assuming the switch itself has failed, make sure the door is closing completely and the latch is engaging properly. Sometimes a latch that’s slightly sticky or a gasket that’s slightly warped is all that’s happening. Give the door a firm, deliberate close and test again. Microwave door latch safety switch inspection 
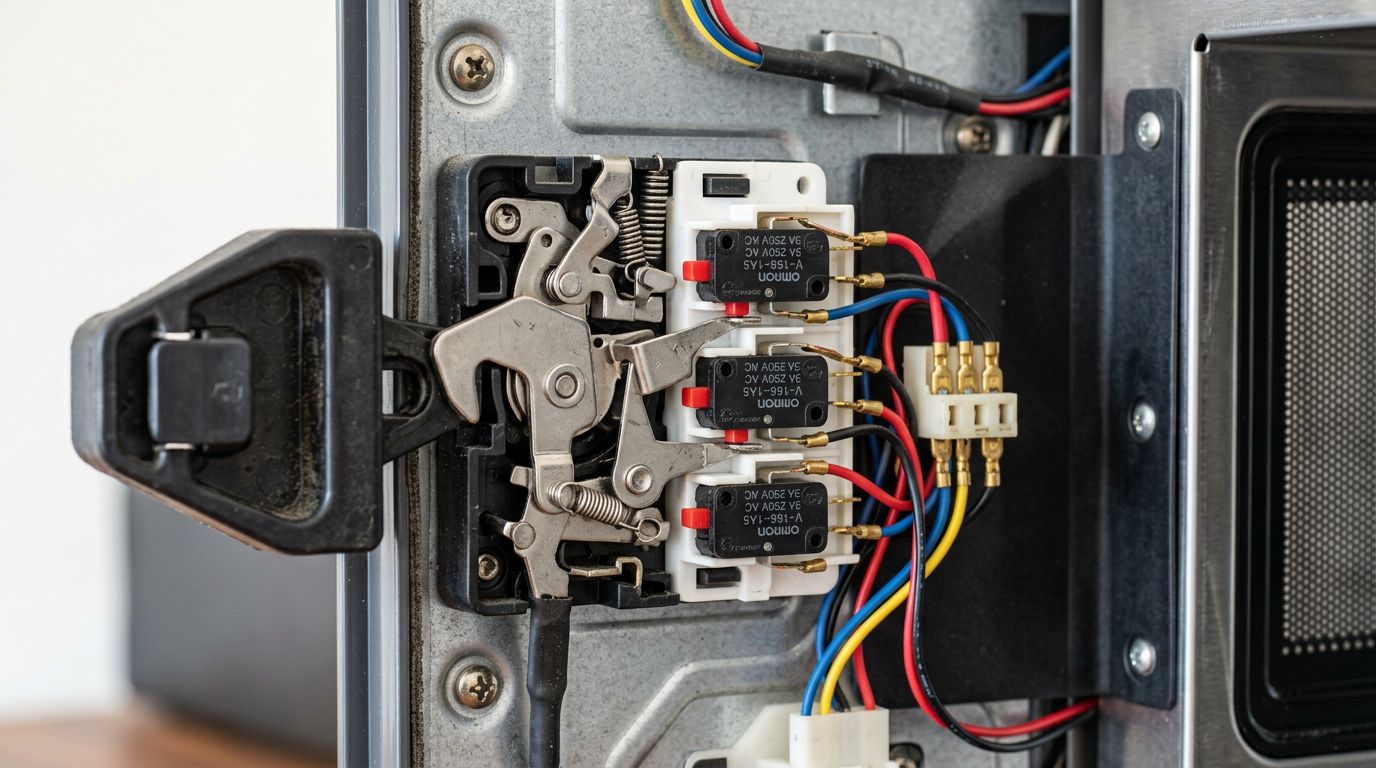
If you’re in an older home around Bradner or Matsqui, where kitchen renovations sometimes mean cabinets have shifted slightly over the years, it’s worth checking whether the microwave frame itself is sitting level a unit that’s tilted can affect how the door closes and latches.

The internal components: what’s likely failing and why it matters

If you’ve ruled out power settings, lock modes, and door issues, you’re looking at a component failure inside the unit. There are three main culprits.

The magnetron

The magnetron is the heart of the microwave. It converts electrical energy into the microwave radiation that heats food. When it fails, you get exactly the symptoms described: everything runs, nothing heats. Magnetrons don’t typically fail gradually they tend to work, and then they don’t. A failed magnetron usually means replacement. The part itself ranges in price, and labour adds to that, so the repair cost on a basic countertop model can approach or exceed what the microwave is worth. On a higher-end built-in unit, repair is still usually the right call financially. Do not try to test or replace a magnetron yourself. The magnetron is located deep within the high-voltage section of the microwave, and the capacitor in that area stores thousands of volts. It does not discharge when you unplug the unit. This is not a figure of speech about caution it’s a genuine, documented safety hazard. Former appliance technicians at major manufacturers have specifically noted that microwaves are the one appliance where they drew the line on DIY guidance, for exactly this reason.

The high-voltage diode

The high-voltage diode works alongside the magnetron, converting the power supply’s alternating current into the direct current the magnetron needs to fire. A failed diode means the magnetron never gets the power it requires, even if the diode itself and the surrounding components appear fine visually. Symptoms of a bad diode include a microwave that runs silently without heating, or one that makes an unusual buzzing or humming sound during operation. Like the magnetron, the diode sits in the high-voltage section of the unit. Professional diagnosis and repair applies here.

The thermal fuse

Many microwaves include a thermal fuse that cuts power to the magnetron if the unit overheats. Once this fuse blows, the microwave will run but won’t heat until the fuse is replaced. It’s a relatively inexpensive part, but it’s located inside the unit, and the same capacitor warnings apply. One clue that a thermal fuse is the issue: if your microwave recently ran for an unusually long time, or was used in a poorly ventilated spot (like pushed too far back into a cabinet without clearance), overheating is a plausible cause. We see this fairly often in Clearbrook where older kitchen layouts sometimes have tighter-than-ideal cabinet fits around built-in appliances.

When to repair and when to replace

This is the honest conversation nobody always wants to have, but it matters. Not every microwave is worth fixing. Here’s a practical way to think about it. If the repair cost is going to exceed half the price of a comparable replacement unit, and your microwave is more than five or six years old, replacement is usually the smarter financial move. Countertop models under $150 fall into this category almost automatically a service call alone, before any parts, can run $75 to $100 in our area. Built-in microwaves, over-the-range units, and combination microwave-oven units are a different calculation. These cost significantly more to replace, and installation adds further expense. A $200 repair on a unit that would cost $800 to replace and install? That math favours repair. Appliance repair technician fixing built-in microwave The other factor is the nature of the failure. A door switch replacement on an otherwise solid microwave is a reasonable investment. A magnetron replacement on a microwave that’s already eight years old, with a cracked interior cavity liner and sticky buttons, is probably just delaying the inevitable. If you’re not sure where things stand, a proper diagnosis from a qualified technician will at least tell you exactly what you’re dealing with before you commit to anything. You should be able to get a clear explanation of the fault and the parts cost before you agree to any work.

What not to do

This section is short, but it’s worth saying clearly. Do not open the microwave case and start probing components unless you have specific training in high-voltage electronics. The capacitor inside a microwave can hold a charge of 2,000 volts or more, and it can retain that charge for hours or longer after the unit is unplugged. There is no visual way to tell if it’s discharged. This isn’t an internet rumour it’s well-documented, and it’s the reason that Whirlpool’s technical training specifically prohibited repair staff from giving microwave internal repair advice to end users. Do not continue using a microwave with a cracked or damaged interior cavity, sparking, burning smells, or an arcing issue. These are not cosmetic problems. Get it checked or replace it. And honestly, if a YouTube video makes a microwave repair look simple, it’s because they’ve edited out the parts about capacitor discharge procedures and the specific tools required. Some repairs really are fine for a handy homeowner. Microwave high-voltage components are not among them. For anything beyond basic appliance troubleshooting, Natural Resources Canada’s energy efficiency guidance is worth a look if you’re deciding between repairing and replacing from an energy-use standpoint.

Frequently asked questions

Homeowners researching a microwave that won’t heat tend to have a few very specific follow-up questions. Here are the ones we get most often, answered directly.

Is it safe to use a microwave that runs but doesn’t heat?

Generally speaking, a microwave that runs without heating isn’t dangerous to stand near but you shouldn’t keep using it as if it’s working, because you won’t actually be cooking food safely. Underheated food is a real problem from a food safety standpoint: bacteria that should be killed during heating won’t be if the food only reaches 30 degrees instead of the proper temperature. Get the issue diagnosed rather than trying to compensate by running it longer.

Can a blown fuse cause a microwave not to heat?

Yes, but there’s an important distinction. The main line fuse, if blown, usually means the microwave won’t power on at all. The thermal fuse that protects the magnetron is different when that one goes, the microwave will appear to operate normally but produce no heat. Fuse replacement is relatively inexpensive, but because it requires opening the cabinet and working near high-voltage components, it’s a technician job rather than a DIY task. For guidance on understanding your home’s overall electrical system, the Canadian Centre for Occupational Health and Safety has useful general electrical safety information.

How long should a microwave last?

A well-maintained microwave typically lasts 9 to 10 years with regular use. Built-in models that run less frequently can last longer. Magnetrons themselves are rated for around 2,000 hours of actual operation time, which, for most households, works out to many years of normal use. If your microwave is under five years old and failing, repair almost always makes sense. If it’s pushing ten years and showing multiple issues, replacement is worth considering seriously.

Why is my microwave heating unevenly?

Uneven heating is usually a turntable issue either the tray isn’t sitting properly on the roller ring, or the turntable motor is failing and the tray isn’t rotating as it should. A non-rotating tray means hot spots and cold spots in whatever you’re cooking. This is one of the more DIY-accessible problems: check that the tray is seated correctly, clean the roller ring and its track, and test again. If the motor itself has failed, that’s a repair a technician can diagnose quickly. Uneven heating can also result from a magnetron that’s starting to degrade but hasn’t failed completely it produces less consistent output before it quits entirely.

What does it mean when the microwave hums loudly but doesn’t heat?

A loud, unusual hum during operation different from the normal fan noise often points to a failing or shorted high-voltage diode. The diode is trying to do its job, isn’t managing it properly, and the electrical resistance is producing that sound. This is a component failure that needs professional diagnosis.

Wrapping up

A microwave that runs without heating is frustrating, but it’s almost never mysterious once you work through the possibilities systematically. Start with the free checks: power level, control lock, demo mode, door latch. If those don’t resolve it, you’re likely looking at an internal component failure and at that point, the honest advice is to get a professional diagnosis before spending anything, because the repair-versus-replace calculation depends entirely on what’s actually failed and what the unit is worth. If you’re dealing with a microwave that won’t heat, or any other appliance giving you grief, Abbotsford Appliance Repair Pros handles microwave repair in Abbotsford and the surrounding area, along with fridge repair, stove repair, dishwasher repair, washer repair, dryer repair, and more. We’ll tell you straight whether something is worth fixing before we touch it. Give us a call and we’ll help you figure out the best path forward.

Dryer not heating — why it happens and when to call for repair

Your dryer is running, the drum is spinning, but the clothes come out just as wet as they went in and nobody wants to deal with that, especially on laundry day. This guide will walk you through the most common reasons a dryer stops heating, what you can check yourself, and when it makes sense to call in a professional.

Here in Abbotsford, our damp climate means the dryer gets a real workout especially through the fall and winter months when line drying outside just isn’t realistic. A dryer not heating isn’t just an inconvenience; it can throw off your whole household routine. At Abbotsford Appliance Repair Pros, we see this problem regularly, and the good news is that many of the causes are surprisingly straightforward once you know what to look for.

That said, some fixes are genuinely DIY-friendly, and others are best left to someone with the right tools and training. The goal here is to help you figure out which category your situation falls into so you’re not wasting time on simple checks when there’s a bigger issue, and not calling for service when you could have solved it in five minutes.

Key takeaways

  • A dryer can spin normally without producing any heat, because the drum motor and heating system run on separate circuits.
  • Clogged lint screens and blocked vents are the most common causes of poor drying performance, and both can be fixed without tools.
  • Electric dryers require a full 240-volt power supply if only one leg of the circuit is working, the drum may spin but the heater won’t activate.
  • A blown thermal fuse is a one-time safety device; it cannot be reset and must be replaced before the dryer will heat again.
  • Dryer vents should be cleaned at least once a year, and more often in high-use households blocked vents are the leading cause of both heating problems and dryer fires.
  • If a repair would cost 50% or more of what a new dryer costs, replacement is usually the smarter move, especially on a machine that’s more than 10 years old.

Dryer not heating key takeaways infographic

Why your dryer isn’t heating

The short answer: the drum and the heating system are two separate things. Your dryer can spin all day on a partial electrical connection or with a tripped safety component, while producing zero heat. So a tumbling dryer that isn’t actually drying anything is a very specific kind of problem not a general “the dryer is broken” situation.

Abbotsford dryer repair expert inspecting laundry unit

There are really two categories to think about here. The first is a true heating failure, where the dryer genuinely isn’t producing warm air at all. The second is poor drying performance, where there is some heat but clothes are still coming out damp after a full cycle. Both are frustrating, but they point to different causes. A completely cold dryer usually means a blown thermal fuse, a failed heating element, a power supply issue, or a closed gas valve. A dryer that heats but doesn’t fully dry is more often a ventilation or load-size problem.

In our experience, people often assume something expensive has broken when the actual issue is a clogged vent or a lint screen that hasn’t been cleaned in months. Start with the simple stuff before you assume the worst.

The easy checks start here before anything else

Before pulling the dryer apart or calling anyone, run through these basics. They cost nothing and take maybe ten minutes total.

First, check your lint screen. Pull it out and take a look if it’s covered in a thick grey mat, that’s your first problem. A blocked lint screen restricts airflow, which puts stress on the heating system and can cause the dryer to overheat and shut down. Clean it after every single load, no exceptions. About every six months, give it a deeper clean with a nylon brush, hot water, and a bit of liquid soap, then let it dry fully before putting it back. It sounds like overkill until you realize how much lint actually makes it through.

Clogged dryer lint trap and exhaust vent

Next, check the vent hose running from the back of the dryer to the outside of your home. If it’s kinked, crushed behind the dryer, or packed with lint, hot moist air can’t escape and your clothes will never fully dry no matter how long the cycle runs. The entire vent run, from the back of the machine to the exterior exhaust hood, should be cleaned at least once a year. Households with kids, pets, or heavy laundry loads probably need it done more often. We get a lot of calls from homes in older Abbotsford neighbourhoods around Clearbrook and Montrose in particular where vents run longer distances through the wall and accumulate lint faster than most people expect.

Also worth checking: load size. Fill the drum to about three-quarters full. Overstuffed loads don’t tumble properly, air can’t circulate, and clothes will stay damp even in a perfectly functioning dryer. And if your clothes came out of the washer absolutely soaking wet, run another spin cycle before transferring them. Very wet clothes overwhelm a dryer’s capacity to handle moisture, which can look like a heating problem when it isn’t.

Power supply problems electric vs. gas dryers

Once you’ve ruled out the simple stuff, power supply is the next thing to look at. This is where electric and gas dryers differ significantly, so it’s worth separating them out.

An electric dryer requires a full 240-volt supply to operate. Here’s the thing that surprises a lot of people: electric dryers run on two separate 30-amp circuit breakers. One breaker runs the motor that spins the drum. The other runs the heating element. If only one breaker trips which happens more often than you’d think the drum will spin normally, but there will be no heat whatsoever. The dryer looks like it’s working, and it technically is, just without the part that matters. Go to your breaker panel, find the double-pole breaker for the dryer, and reset both sides. If it trips again immediately, that’s a sign of a deeper electrical issue and you should call a licensed electrician rather than keep resetting it.

For a gas dryer, the issue is usually simpler. Gas reaches the burner through a supply valve, and if that valve is closed or only partially open, the drum will spin but nothing will heat. Check that the valve handle is parallel to the gas pipe, which means it’s open. If it’s perpendicular, it’s closed. That’s sometimes all it takes. Beyond the valve, gas dryers also have components like igniters and flame sensors that can fail. Any repair that involves the gas line itself should go to a qualified technician this is not an area for guessing.

When the problem is inside the machine

If the easy checks didn’t solve it, and the power supply looks fine, the issue is likely inside the dryer itself. These repairs require disassembling the machine, and they’re generally worth having a professional handle unless you’re comfortable with appliance repair and have a multimeter.

Thermal fuse

The thermal fuse is a small, inexpensive safety component designed to blow if the dryer overheats. It’s a one-time device. Once it trips, the dryer will not heat again until the fuse is physically replaced. You cannot reset it, and there’s no workaround. It’s usually located near the blower housing or the heating element, and it can be tested with a multimeter no continuity means it’s blown.

Here’s the important part: if your thermal fuse blew, it blew for a reason. Nine times out of ten, it’s because the vent was clogged and the dryer was overheating. Replace the fuse, but also clean the vent otherwise the new fuse will blow too, and you’ll be back to square one.

Heating element (electric dryers)

Electric dryers use a coiled heating element to warm the air inside the drum. Over time, that coil can burn out sometimes due to age, sometimes because restricted airflow caused it to run too hot for too long. A visible break or burn mark in the coil is a clear sign it’s failed. A multimeter test for continuity will confirm it if there’s no obvious damage. Replacement requires removing the back panel of the dryer and handling the element carefully. It’s a manageable repair for someone with some appliance experience, but if you’re not sure what you’re doing, the better move is to call someone who does.

Testing dryer heating element with multimeter

Thermostat issues

Dryers typically have more than one thermostat a cycling thermostat that regulates temperature during a normal cycle, and a high-limit thermostat that cuts power if things get dangerously hot. Either one can fail. A stuck or defective thermostat can cause the dryer to produce some heat but not enough to properly dry clothes, or it can cause the dryer to start heating and then cut out partway through a cycle. Both are testable with a multimeter. A faulty thermostat will show no continuity when tested at room temperature.

One thing we see occasionally in older homes – particularly those in areas like Abbotsford’s west end with original electrical panels – is a combination of a marginal power supply and a marginal thermostat working against each other. Individually, neither problem would necessarily take the dryer out of service. Together, they make the machine nearly useless. That’s the kind of diagnosis that benefits from a professional eye.

Gas dryer heating problems specifically

Gas dryers have a few additional components that don’t exist in electric models. The igniter is what lights the gas to create the flame that heats the air. If the igniter is failing, you might get intermittent heat the dryer works fine for a cycle or two, then stops heating, then works again. A faulty flame sensor has a similar effect, cutting off the gas supply even when the igniter is working correctly.

These parts are testable and replaceable, but working on a gas appliance carries risks that working on an electric one doesn’t. If you smell gas at any point during your troubleshooting, stop immediately, don’t operate any switches, and call your gas utility. For anything beyond the valve check we mentioned earlier, a licensed technician is the right call for gas dryer repair. It’s not worth the risk to save a service fee.

For a broader overview of gas appliance safety in the home, Natural Resources Canada has useful guidance on how gas appliances should be maintained and serviced safely.

When to repair vs. replace

This is the question we get asked most often, and honestly it’s a fair one. A dryer that’s not heating can sometimes be fixed for $50 in parts and an hour of work. Other times, you’re looking at a machine that’s had a hard life and is starting to fail in multiple places.

A useful rule of thumb: if the repair cost would run 50% or more of what a comparable new dryer costs, replacement is usually the smarter long-term choice. A basic residential dryer runs anywhere from $600 to over $1,000 new, so that threshold gives you a reasonable ceiling for what a repair is worth spending. Age matters too. A dryer under eight years old with a blown thermal fuse is almost always worth fixing. A fifteen-year-old machine with a dead heating element, a questionable thermostat, and worn drum bearings is probably telling you something.

If you’re doing the math and it’s not clear, a diagnostic visit from a qualified technician will at least give you an honest answer. The Energy Star program is also worth checking if you’re considering a new machine newer certified models can reduce energy use significantly compared to older dryers, which sometimes makes replacement the better financial decision even when a repair is technically possible.

Frequently asked questions

These are the questions we hear most often from homeowners trying to sort out a dryer not heating. Some have simple answers, and some have answers that depend on what’s actually going on with your specific machine.

Why is my dryer running but blowing cold air?

The drum motor and the heating system are independent, so the dryer can run perfectly fine mechanically while producing no heat at all. The most likely causes are a blown thermal fuse, a failed heating element (in electric dryers), a tripped circuit breaker, or a closed gas valve (in gas dryers). Start with the breaker panel and the gas valve both take two minutes to check. If those are fine, the issue is probably inside the machine.

Can I keep using the dryer if it’s not heating?

Technically, yes it will tumble your clothes and remove some lint. But it won’t actually dry anything. Running wet clothes through repeated cycles hoping for a miracle is a waste of electricity and adds unnecessary wear on the motor and belt. More importantly, if the dryer stopped heating because of a blocked vent or overheating issue, continuing to run it could create a fire hazard. Stop using it, find the cause, and fix it before running more loads.

How do I know if the heating element is bad?

Unplug the dryer first. Remove the back panel (on most models) and look at the heating element inside its metal housing. A visible break, burn mark, or crack in the coil is a clear sign of failure. If there’s no obvious damage, you can test it with a multimeter set to continuity a good element will show continuity, a failed one won’t. If the multimeter reads zero or infinite resistance, it’s time for a replacement. If you’re not comfortable with either step, that’s a perfectly reasonable reason to call a technician.

Why does my dryer start heating and then stop mid-cycle?

This usually points to one of a few things: a partially clogged vent that causes the dryer to overheat and trigger the safety cutoffs, a cycling thermostat that’s worn out, a heating element with a hairline crack that fails once it gets hot, or a faulty moisture sensor that tells the control board to stop heating before the clothes are actually dry. Intermittent heating problems are often trickier to diagnose than total heating failures, because the issue may not be present when a technician first looks at the machine. Describing exactly when and how the heating stops will help narrow it down faster.

Is dryer vent cleaning something I can do myself?

For most homeowners, yes. Disconnect the flexible duct at the back of the dryer, reach in with a dryer vent cleaning brush (available at any hardware store), and work your way through the vent to the exterior exhaust hood. Vacuum out what you can reach. For longer vent runs or vents that haven’t been cleaned in years, a professional vent cleaning service will have the equipment to do a more thorough job. Either way, get it done at least once a year. It’s one of those maintenance tasks that has a real safety payoff, not just an efficiency one. The National Fire Protection Association consistently identifies clogged dryer vents as a leading cause of residential fires.

Wrapping up

A dryer not heating almost always comes down to one of a handful of causes: a ventilation or lint problem, a power supply issue, a blown thermal fuse, or a failed heating element or thermostat. The first two categories are DIY-friendly and worth checking before anything else. The second two usually require opening the machine and, in some cases, professional diagnosis and repair. If you’re not sure where things stand, or if you’ve worked through the basics and still can’t find the problem, that’s exactly when it makes sense to get a technician involved. At Abbotsford Appliance Repair Pros, we handle dryer repair across Abbotsford and the surrounding area along with washers, fridges, stoves, dishwashers, and other household appliances. Give us a call and we’ll help you figure out whether a repair makes sense or whether it’s time to move on to something new.

Refrigerator ice maker not working — common causes and quick fixes

Your refrigerator ice maker stopped working, and now you’re stuck chipping ice out of a tray like it’s 1987. This guide walks you through the most common causes and the fixes you can actually do yourself, plus how to know when it’s time to call in some help.

Nobody wants to open the freezer and find an empty ice bin, especially in the middle of a warm Abbotsford summer when the last thing you feel like doing is troubleshooting an appliance. The good news? Most ice maker problems come down to a short list of causes, and a lot of them are surprisingly easy to fix without any special tools.

At Abbotsford Appliance Repair Pros, we field calls about fridge ice maker repair all the time. In our experience, the majority of ice maker issues get resolved with a few simple checks, and understanding what to look for first can save you a lot of time and frustration.

Key takeaways

  • The most common reasons a refrigerator ice maker stops working are a turned-off control arm, a clogged water filter, incorrect freezer temperature, or a frozen or kinked water line.
  • Water filters should be replaced every six months; a clogged filter alone can reduce or completely stop ice production.
  • Your freezer should be set to 0 degrees Fahrenheit (-18 degrees Celsius) for the ice maker to function properly, and your fridge compartment should be between 33 and 40 degrees Fahrenheit.
  • The water inlet valve needs at least 20 psi of water pressure to open and close correctly; anything less and water won’t reach the ice tray.
  • A simple power cycle, unplugging the fridge for one minute, can resolve minor ice maker glitches without any disassembly.
  • If the ice maker was just installed, it can take up to 24 hours before the first batch of ice is ready, and the first two or three cycles may produce empty or discolored cubes.

refrigerator ice maker not working troubleshooting infographic

Why your refrigerator ice maker is not working

refrigerator ice maker shut off arm troubleshooting

When your ice maker stops producing ice, the problem usually traces back to one of four things: it’s been switched off, it’s not getting water, the temperature is off, or something mechanical has jammed or frozen. That’s the short answer. Most cases of an ice maker not producing ice can be resolved at home without calling anyone.

Start with the obvious before you do anything else. Check whether the ice maker is actually turned on. It sounds almost too simple, but this is one of the more common calls we get. On older models, the control arm, that rigid metal or plastic bar that rests above the ice bin, can accidentally get bumped into the off position. If the arm is raised, push it back down gently and see if the machine starts its cycle. On newer fridges with digital displays, check that the ice maker hasn’t been toggled off at the panel.

If it’s on and still nothing is happening, the next step is a power cycle. Unplug the refrigerator for one full minute, then plug it back in. Wait a couple of hours before judging whether it worked. This clears minor glitches in the control board and sometimes that’s all it takes.

Water supply problems: the most overlooked cause

Once you’ve confirmed the ice maker is switched on, water supply is the next place to look. A refrigerator ice maker not working often has nothing to do with the ice maker itself. The problem starts further back in the line.

Pull your fridge away from the wall carefully and take a look at the water line running into the back of the unit. A kinked or pinched line will cut water flow significantly. Fridges get pushed back hard against walls all the time, and that thin plastic or copper tubing gets bent in the process. Straighten any kinks you find and give the fridge a few inches of clearance. Use 1/4-inch O.D. soft copper or PEX tubing if the line needs replacing, and leave a small service loop so the fridge can be moved in the future without pulling the line taut.

Beyond the water line, check the inlet valve. Most refrigerators use an electromagnetic solenoid valve at the rear that opens briefly to let water into the ice maker. If the household water pressure feeding that valve is below 20 psi, the valve won’t open fully and water won’t reach the ice tray. A plumber or appliance technician can check this with pressure testing equipment. If pressure is fine but the valve still isn’t working, the valve itself may need replacing. It’s a relatively inexpensive part, but installation does involve working with water connections, so some homeowners prefer to hand that one off.

Water filter issues and why they matter more than people think

Your refrigerator’s water filter sits between the main water supply and the ice maker. Over time it traps mineral deposits, sediment, and contaminants, which is exactly what it’s supposed to do. The problem is that a clogged filter eventually restricts water flow to the point where the ice maker either produces very small cubes or stops making ice altogether.

new vs clogged refrigerator water filter comparison

The standard recommendation from manufacturers including GE, Maytag, and KitchenAid is to replace the filter every six months. In practice, some households need to change it more frequently. If you’re in an area of Abbotsford with older infrastructure or if there’s been recent construction nearby, sediment in the local water supply can clog a filter faster than usual. Watch for signs beyond just reduced ice production: water dispensing slowly, ice with an odd taste, or visible black specks in the water.

One thing worth checking if you’ve just replaced the filter: make sure it’s seated correctly. An improperly installed filter can cause as much trouble as a clogged one. Remove it, try dispensing water without the filter in place, and if water flows freely, the filter wasn’t locked in properly. Reseat it until it clicks into position and check again.

Curious about what’s actually in your tap water? The Health Canada drinking water guidelines give a solid overview of what municipal water treatment covers and what a household filter is designed to catch.

Temperature settings and how they affect ice production

Temperature is one of those factors that seems obvious after the fact but gets missed constantly during troubleshooting. If the freezer is too warm, water won’t freeze in time to complete the cycle. If it’s too cold, different problems show up.

digital thermometer freezer temperature setting

The target freezer temperature is 0 degrees Fahrenheit, which is -18 degrees Celsius. Your fridge compartment should sit between 33 and 40 degrees Fahrenheit, or 0 to 4 degrees Celsius. The ice maker itself won’t even begin a cycle until it reaches 16 degrees Fahrenheit, so if the freezer is warmer than it should be, you may be seeing delayed or absent ice production as a result.

Freezer temperatures that drop below -10 degrees Fahrenheit create a different issue. Cubes freeze too fast on the outside, which tricks the thermostat into ejecting them before the center has fully solidified. You end up with hollow or unusually small cubes. If you’re seeing that, bump the freezer temperature up slightly toward 0 degrees and see if production improves.

A low food load in the freezer can also affect temperature consistency. A mostly empty freezer has less thermal mass, which means temperatures fluctuate more. Filling it three-quarters full or adding a few water jugs if it’s sparse helps stabilize things.

The water inlet tube: a frozen line you might not see

Sometimes the freezer temperature is correct, but the small water inlet tube feeding the ice maker has frozen over anyway. This is one of those problems that’s harder to spot because the tube sits at the rear of the ice maker, out of sight. You might suspect it when the ice maker runs through its cycle but no water fills the tray.

To fix a frozen water line, unplug the fridge and remove the ice maker, usually two screws and a couple of plugs at the back wall of the freezer. With the machine out, you can direct warm air from a hair dryer at the inlet tube. Keep the dryer moving, use medium heat, and don’t let it contact any water. Once thawed, reinstall everything and check that the freezer temperature is properly set before plugging back in.

If the line keeps freezing despite correct temperature settings, there may be a slow drip from the inlet valve itself that refreezes overnight. That points to the inlet valve needing replacement. It’s worth getting a professional opinion at that stage rather than continuing to defrost the line on a recurring basis.

When ice is forming but not dispensing

A different scenario is when the ice maker is making ice just fine, but nothing comes out when you press the dispenser lever. The bin looks full through the door, but no ice moves. This points toward the dispenser mechanism rather than the ice production side of things.

Large ice clumps are often to blame. If the bin hasn’t been emptied in a while, cubes fuse together into chunks that the auger, the screw-like mechanism inside the bin, can’t break up. Small clumps can be broken up by hand. Larger, more solidified masses usually require removing the bin entirely and letting it defrost at room temperature. Once you start using the ice more regularly, clumping becomes less of an issue.

Ice lodged in the dispenser chute is another culprit. Look up into the chute carefully. If cubes are stuck, resist the urge to chip at them with anything sharp. Set a towel and a dish under the chute and let the blockage melt on its own. This is one of those fixes that’s cheap but requires patience, and trying to force the ice out can crack the chute housing.

We get calls from homeowners in Clearbrook and throughout Abbotsford about this specific issue more than you might expect. Fridges that aren’t used heavily, or households that entertain infrequently, tend to let ice sit long enough to clump and cause dispenser problems.

Signs it’s time to call a professional

Honestly, most of the issues above are manageable for a handy homeowner with a bit of patience. But there’s a clear line where it makes more sense to call someone in.

Persistent leaking around the ice maker or under the fridge is one of those situations. A leaking ice maker can point to a misaligned fill cup, a faulty water valve dripping between cycles, or an unleveled fridge that prevents meltwater from reaching the drain. Minor leaks become water damage fairly quickly, especially in older homes where flooring and subfloor materials aren’t as forgiving. If you’re noticing water pooling regularly, get it looked at sooner rather than later.

Motor and sensor problems are another category worth handing off. If the auger motor in the bin has frozen over, defrosting it yourself can damage the motor from the thermal stress of thawing. If the ice level sensor is giving a false reading and the bin is overflowing, that requires diagnosing whether the sensor, the control arm, or the control board is at fault. That kind of diagnosis takes more than a visual inspection.

For homeowners in Bradner and surrounding areas, we often see fridge ice maker repair needs come up alongside other appliance issues, so it’s worth having someone check the full unit while they’re there.

If you’re thinking about costs, Energy Star’s refrigerator guidance can help you compare the age and efficiency of your current unit against newer models, which sometimes informs whether a repair is worth pursuing or whether replacement makes more financial sense.

Frequently asked questions

These are the questions we hear most often when people are trying to figure out why their ice maker stopped working. The answers below cover the situations we see come up regularly.

How long does it take for a new ice maker to start producing ice?

After a refrigerator is installed and has had several hours to cool down, the ice maker should produce its first batch within 24 hours. The first two or three cycles may produce empty trays or discolored cubes because air in the new plumbing lines needs to be purged. This is normal. Once water is flowing cleanly through the system, production settles into a regular cycle. If no ice appears after 24 hours, check that the ice maker is switched on and that the water supply line is connected and open.

Why are my ice cubes small or hollow?

Small or hollow cubes usually mean the ice maker isn’t getting enough water, or the temperature in the freezer is outside the ideal range. Start by checking whether the water filter is overdue for a replacement, then look for any kinks in the water supply line. Also verify that the freezer is set to 0 degrees Fahrenheit. Temperatures below -10 degrees Fahrenheit can cause the outside of a cube to freeze too quickly, triggering early ejection before the center solidifies, which is exactly what a hollow cube looks like.

Why does my ice taste or smell strange?

Off-tasting ice almost always comes from one of two sources: an old water filter that’s no longer doing its job, or ice that’s absorbed odors from food stored nearby. Replace the filter if it’s been more than six months. Dump the existing ice and let the next few batches cycle through. Make sure any strongly scented foods in the freezer are tightly wrapped in freezer-appropriate packaging. If the taste persists after a fresh filter and a clean bin, it may point to a deeper issue with the water supply worth checking with a professional.

My ice maker is making ice but not dumping it into the bin. What’s happening?

If the ice mold is filling and freezing but the cubes aren’t dropping, the ejector mechanism may be stuck. There can be a chunk of ice blocking the mold itself, or the rake that pushes cubes out has jammed. First, check for any ice blocking the mold and carefully clear it. If nothing is visibly jammed, try resetting the ice maker by unplugging the fridge for one minute. If the problem continues, the motor or gear assembly responsible for ejection may need inspection.

Is it worth repairing an ice maker, or should I replace the fridge?

For most ice maker problems, repair is the sensible path. Parts for common issues like a water inlet valve, control arm, or filter housing are generally affordable, and a qualified technician can diagnose and fix most problems in a single visit. Where the math changes is when a fridge is older, inefficient, or has other problems alongside the ice maker. In those cases, it can be worth comparing the repair cost against the energy savings and reliability of a newer unit.

Wrapping up

Most cases of a refrigerator ice maker not working come down to one of a handful of problems: the machine got switched off, the water supply is restricted or frozen, the filter is overdue for a change, or the temperature settings need adjusting. Start with the simple checks first, work through them methodically, and you’ll solve the problem most of the time without any professional involvement. When you do run into something more involved, like a faulty inlet valve, a frozen auger motor, or a persistent leak, that’s where having someone take a proper look saves you from making a small problem bigger.

If you’d rather not work through the diagnosis yourself, or if you’ve already gone through the basics and things still aren’t right, Abbotsford Appliance Repair Pros handles fridge repair in Abbotsford and the surrounding area. Give us a call and we’ll help you figure out exactly what’s going on and the most practical way to fix it.

Speak To A Technician In Abbotsford